
Jagvir Goyal
In planned residential areas, the houses built on small size plots are supposed to have common walls. The building bye laws carry such provision. Mostly, plots having up to 300 square yard plot area are governed by such laws. Certain precautions need to be taken while resting intermediate floor slabs and roof slabs on these common walls. Here, let’s have a look at them:
The Concept: Before going into details, it is important to understand the concept of common wall. A common wall is built in such a manner that the centre line of common wall matches with the plot line of two adjacent plots. Of the two owners of adjacent plots, whosoever builds his house first, builds the common wall by matching its centre line with the plot line. If a 9 inch wall is built, 4.5 inch of it rests on his plot and other 4.5 inch on his neighbour’s plot. Thus, 50% of the wall belongs to each plot owner but built by first house builder. Later, when his neighbour builds his house, he pays 50% cost of the wall to first builder and uses it for resting the slabs of his house on it and as a wall for the porch or passage or rooms of his house.
Bearing for slabs: When the wall masonry reaches slab level and arrangements for laying the slab are to be started, the first step to be taken is to create bearing for the slab in the common wall. For this purpose, chase cutting is done in the common wall. While doing chase cutting, take care that the depth of chase cutting is kept equivalent to 50% of thickness of wall. Thus in a 9 inch thick wall, the chase cutting should be 4.5 inch deep. If chase cutting is done for more than 4.5 inch, it will create trouble for the existing house. If less than 4.5 inch cutting is done, the slab will not get proper bearing on the wall. Further, the chase cutting should have uniform depth throughout the length of the wall. Giving proper bearing to slab will help in transferring its load to the foundations through the walls.
Match slab levels: The building bye laws prescribe the plinth level and height of each storey of the house. Therefore, if the building byelaws are followed, the RCC slabs of adjacent houses should rest at same level. A difference in levels of RCC slabs resting on common wall may create trouble for the existing house owner as his walls may get damp patches and costly painting work done on it may get damaged.
Apply bitumen coating: Once the chase cutting in the common wall has been done to create bearing area for resting the RCC slab, it is preferable to paint the niche thus created in the wall with bituminous paint. This job should be accomplished before start of laying of reinforcement for the slab. The bituminous paint should be applied well on the masonry of wall and visible edge of the slab of existing house. This application will break the joint of the slab to be laid with the existing slab and wall and prevent seepage of water towards the inner face of common wall.
Leave gap for expansion: It is always better to leave gap between the existing RCC slab resting on the common wall and the new RCC slab now being rested on it. This gap helps in free movement of slabs during expansion in summers and helps in avoiding appearance of cracks in RCC slabs. A 10 mm gap if left between the two slabs is helpful. During construction, masons find it difficult to leave this gap. For this purpose, compressible board of 10 mm thickness can be securely and vertically fixed along the edge of the existing slab before laying of reinforcement and after the application of bituminous material in the niche.
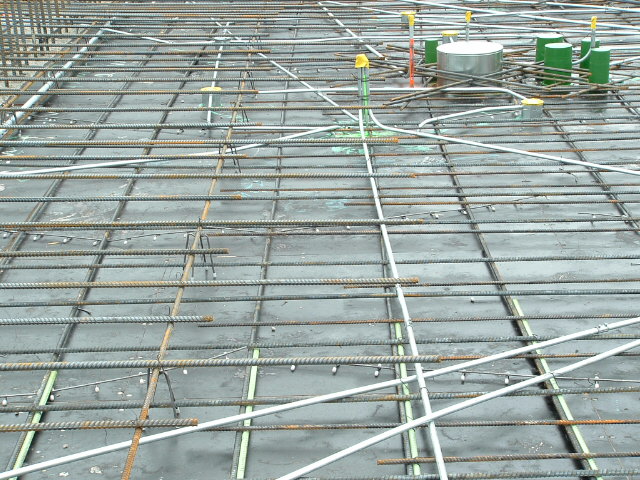
Take care of reinforcement: When the slab reinforcement is laid, it is important to ensure that the reinforcement bars enter the niche created for resting the slab on common wall and rest on cover blocks provided below the bars. It has been often noted even in works supervised by specialized agencies that the reinforcement bars remain short of the edge of the common wall and hardly enter the niche in it. A gap of just 20 mm to 25 mm should be left between the fixed compressible board and end of reinforcement bars to allow edge cover to the bars. The reinforcement bars in the bottom layer as well as top layer should be made to enter this bearing area. Running the cross binder bars of reinforcement is also important.
Compact the concrete well: After satisfactory laying and checking of steel reinforcement and making an overall check of everything in place and ready to receive concrete, the laying of concrete in slab should be started. During the laying of concrete, it should be ensured that the bearing area created by cutting the niche in the common wall is filled well with concrete and the concrete is compacted well. Non compaction of concrete will leave it porous to receive water and cause trouble later on besides making the bearing area of RCC slab weaker.
Care during curing of slab: Once the RCC slab has been laid and the gap created in the common wall is filled well, it is time to do full curing of RCC slab to enable it to gain strength. For curing of slab, the general practice is do ponding of water on it by creating temporary sand bunds all around. During the process, care should be taken that water or moisture doesn’t enter the wall masonry of existing house and spoil the costly paint or plastic emulsion on the inside face of wall. Best method to avoid such damage is to immediately build a concrete ‘gola’ along the common wall on the top of the RCC slab laid and then do the curing of the slab.